Last week in class we tried designing the cheapest possible bridge that was still stable enough for a truck to cross over safely. The approximate cost we got was not nearly low enough as the one in class was $125,000. However, it was a very good learning experience, showing me how important the material, length, and position of each beam is. In the coming weeks we are going to work better as a team to accomplish our goals quicker, and hopefully we will also acquire better results then how we did when we worked individually. The biggest accomplishment of the team last week was designing a bridge that cheap, saying that our cheapest bridge the previous week was still over $500,000. That is a major improvement right there. I think our team shares the same basic ideas of how to build the bridge. I see this as a problem because we then become less creative and have less ideas as to how to improve our bridge and make it cheaper to build at the same time.
I think WPBD is very realistic in terms of what's needed to build a real bridge. While the animations of the truck testing out the bridge are over exaggerated, the tests still show us the best possible ways to improve the bridge to be the best and cheapest to build it can possibly be. WPBD is realistic by addressing the proper materials, tension/compressions of each beam, and approximate cost that the bridge would be to build, especially since WPBD uses actual materials used to build real bridges. This will not be as effective for us though when we build using knex. However, some of the concepts will be the same and should help guide us to building the best/cheapest bridge possible.
Tuesday, April 24, 2012
Week 4 Post
1. What did you do in the prior week?
I worked on designing a new bridge with much less cost and less use of materials. The bridge I designed was roughly $262,000.00 and was 600 thousand less than the one I built two weeks ago. I still need to work on the design to get close to the 200K mark that some students were at a week ago and attempt to surpass their efforts.
2. What do you and your team have planned for the upcoming week?
The group is going to continue to build off of our current designs in which we have 3-6 working ones. We will also start getting together to combine ideas in order to consolidate the best aspects of each design into one ultimate bridge.
3. Major accomplishments of the week for the team
The bridge that we designed during the course of the week 3 class turned out to be the most important completion of the term for our group and definitely sparked some thoughts as to where our next path will be in future designs.
Some important information I found on Internet:
TIPS FOR WEST POINT BRIDGE DESIGN
Tip #1
According to the contest rules, your design submission will be rejected if it is identical to one already submitted by someone else. So it is in your best interest to submit a design as soon as possible after the contest starts. There's no limit on the number of entries you may submit, so you can keep trying to improve your design -- even after you have submitted it for judging.
Tip #2
To learn how to reduce the cost of your design, start up WPBD 2007 and click the Help menu, then select "How to Design a Bridge…." On the diagram, click the blocks labeled "Optimize the Member Properties," "Optimize the Shape of the Truss," and "Find the Optimum Truss Configuration." Read each of these articles carefully.
Tip #3
It is usually (but not always) most economical to use hollow tubes for compression members and solid bars for tension members. To determine which members are in tension and which are in compression, run the load test. Compression members turn red during the load test animation and tension members turn blue.
Tip #4
If a member fails the load test, there are three ways to make it stronger:
(1) Increase the member size.
(2) Use a stronger type of steel.
(3) If the member is in compression, make it shorter. (Note: The strength of a tension member is not affected by its length.) You can shorten a compression member by moving joints or by splitting a single member into two.
Tip 5: To minimize the cost of your design, you need to understand how the West Point Bridge Designer calculates the cost of your bridge. The cost consists of four components:
1. Material Cost.
2. Connection Cost.
3. Product Cost.
4. Site Cost.
The Material Cost is simply the cost per kilogram of steel. The stronger the steel, the more it costs per kilogram. Hollow tubes cost more per kilogram than solid bars. The Connection Cost is a fixed cost of $150 for each joint in your structural model. The Product Cost is a $600 charge for each “product” used in your design. A “product” is defined as any unique combination of material, section, and size. For example, the following would be counted as four different products: 120mm x 120mm carbon steel bars, 100mm x 100mm carbon steel bars, 120mm x 120mm carbon steel tubes, and 120mm x 120mm quenched & tempered steel bars. A design that included various numbers of these four products would have a total Product Cost of 4 x $600 = $2400.
To see the cost calculations for your design, click the Report Cost Calculations button on the main toolbar.
Tip #6
To greatly speed up the process of optimizing your design, you can switch off the Load Test Animation. To do this, click the Test menu, then select Load Test Options and uncheck the "Display the Animation" box.
Tip #7
To greatly speed up the process of optimizing your design, use the sorting and "block selection" features of the Member List. To learn more about these features, read the "Member List" topic in the West Point Bridge Designer Help file.
Tip #8
Use the "high-resolution grid" setting to fine-tune the positions of the joints in your structural model. In the high-resolution mode, you can place joints at 0.25 meter intervals, in order to achieve an optimal truss configuration.
4. Issues that the team or you as an individual faces
Transforming our 2-d design into a 3-d Knex structure will prove to be a difficult feat in the upcoming weeks.
You've now used the West Point Bridge Designer for several weeks. Address the question of how realistic you think it is (or is not) in terms of what's necessary to design a real bridge. Hint: the program help file has some very good material.
WPBD seems to be a reasonable starting program for those just starting and learning to design bridges although other factors like wind are not taken into account.
Monday, April 23, 2012
Weekly Post (week 4)
1. What you did in the prior week
In the future weeks, we are expected to build a real bridge using Knex. The shape of the real bridge would depend on our design on WPBD. It is important to have a nice design on the WPBD, because it would also partly decide the result of competition 2.
I design another bridge on WPBD, which decrease the budget of the bridge to $242215.7. But it is still not low enough, according to reliable news, the lowest budget in our section is around $219000.
The New Design:

2. What you and your teammates have agreed you'll do in the coming week
We are going to continue improving our design. We own several different designs right now. More communication is necessary in the future to combine the advantages of different designs. We will keep finding the construction that cost the less while meeting the constraints. Designing the bridge in class is a nice experience to work with my team mates.
3. Major accomplishments of the week for the team
The bridge that we designed in the class is one of the most important accomplishments for our team in a week.
Some important information is found on Internet:
TIPS FOR WEST POINT BRIDGE DESIGN
Tip #1
According to the contest rules, your design submission will be rejected if it is identical to one already submitted by someone else. So it is in your best interest to submit a design as soon as possible after the contest starts. There's no limit on the number of entries you may submit, so you can keep trying to improve your design -- even after you have submitted it for judging.
Tip #2
To learn how to reduce the cost of your design, start up WPBD 2007 and click the Help menu, then select "How to Design a Bridge…." On the diagram, click the blocks labeled "Optimize the Member Properties," "Optimize the Shape of the Truss," and "Find the Optimum Truss Configuration." Read each of these articles carefully.
Tip #3
It is usually (but not always) most economical to use hollow tubes for compression members and solid bars for tension members. To determine which members are in tension and which are in compression, run the load test. Compression members turn red during the load test animation, and tension members turn blue.
Tip #4
If a member fails the load test, there are three ways to make it stronger:
(1) Increase the member size.
(2) Use a stronger type of steel.
(3) If the member is in compression, make it shorter. (Note: The strength of a tension member is not affected by its length.) You can shorten a compression member by moving joints or by splitting a single member into two.
Tip 5: To minimize the cost of your design, you need to understand how the West Point Bridge Designer calculates the cost of your bridge. The cost consists of four components:
1. Material Cost.
2. Connection Cost.
3. Product Cost.
4. Site Cost.
The Material Cost is simply the cost per kilogram of steel. The stronger the steel, the more it costs per kilogram. Hollow tubes cost more per kilogram than solid bars. The Connection Cost is a fixed cost of $150 for each joint in your structural model. The Product Cost is a $600 charge for each “product” used in your design. A “product” is defined as any unique combination of material, section, and size. For example, the following would be counted as four different products: 120mm x 120mm carbon steel bars, 100mm x 100mm carbon steel bars, 120mm x 120mm carbon steel tubes, and 120mm x 120mm quenched & tempered steel bars. A design that included various numbers of these four products would have a total Product Cost of 4 x $600 = $2400.
To see the cost calculations for your design, click the Report Cost Calculations button on the main toolbar.
Tip #6
To greatly speed up the process of optimizing your design, you can switch off the Load Test Animation. To do this, click the Test menu, then select Load Test Options and uncheck the "Display the Animation" box.
Tip #7
To greatly speed up the process of optimizing your design, use the sorting and "block selection" features of the Member List. To learn more about these features, read the "Member List" topic in the West Point Bridge Designer Help file.
Tip #8
Use the "high-resolution grid" setting to fine-tune the positions of the joints in your structural model. In the high-resolution mode, you can place joints at 0.25 meter intervals, in order to achieve an optimal truss configuration.
HINT: You can sort the Member List by clicking any one of the column headings. For example, clicking the Size heading will sort the list from the largest member size to the smallest. Clicking the same heading a second time will sort the list from smallest to largest.
HINT: hollow tubes are considerably more efficient than solid bars for carrying compression.
4. Issues that the team or you as an individual faces
We are going to accept the challenge that turns the design on paper into real one. Through our design on “paper” is not the optimal design in the sections. The optimal design on paper will also face the problem that it is difficult to turn it into real one.
Individually, I am expecting to turn the design into the real one, at the same time, I am afraid that it would not work.
You've now used the West Point Bridge Designer for several weeks. Address the question of how realistic you think it is (or is not) in terms of what's necessary to design a real bridge. Hint: the program help file has some very good material.
WPBD provides a good tool for engineering entering, but as the same time, it does not simulate many factors that should be considered in realistic.

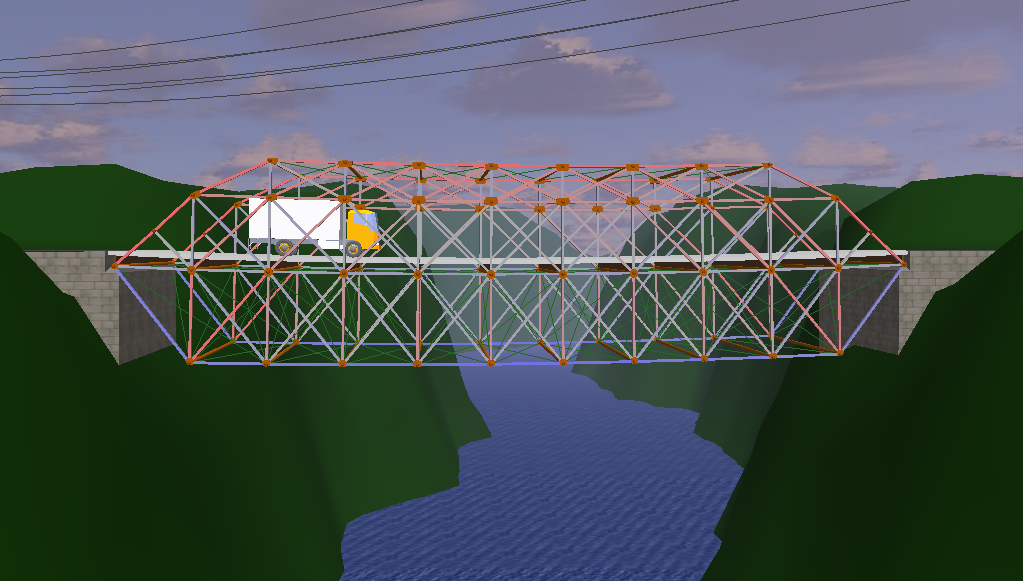
Figure 2: the main structure of a truss bridge (WPBD 2012 HELP )
1. WPBD does not consider the influence coming from some detail factors such as the abutment, the roadway and the deck and the piers. And many environmental factors should also be considered in the design such as the vapor from the river, ice.
2. The fatigue of the material has not been considered in WPBD.
3. The load has been calculated in WPBD are simple. Multiple loads from different sources, such as self-weight, wind and collision of vehicles, are important in real design.
4. The design of the bridge does not consider some emergency conditions such as earthquake.
5. In the WPBD load test, load is stationary shifting from left to the right. In reality, the traffic appears on both sides of the bridge at the same time. The load should be considered in two directions.
6. The aesthetics of the bridge is not an important criterion in WPBD design. In reality, it is very important and in some way, directly decides if it would be adopted by investor.
Wednesday, April 18, 2012


Weekly Post (week 3)
What you did in the prior week
I spent several hours to know the basic knowledge of truss bridge and tired to apply them into the bridge design. Clearly know about the constraint of the design, and come up solution for it.
What you and your teammates have agreed you'll do in the coming week
Several different methods are worth to try. Individual design would benefit diversity ideas, and team work would benefit one optimal design.
Major accomplishments of the week for the team
The whole team worked together for the in-class design. Some major principals of truss bridge design have been determined during this process. It helps a lot in the individual process.
Issues that the team or you as an individual faces
After I have saw the result of the other teams, I realized that my design still have a lot of room to improve. More research should be done in the future.
Three question for librarian.
1. How to find the resources related to that how the different material would impact the building of the bridge?
2. How to find the resources that how the tension force or compression force work on the truss bridge?
3. How to the find the resources that how the height of the bridge impact the force supporting system of the bridge?
A1- Ye
Design goal:
In the circumstances that ensure the safety use of the
bridge, decrease the budget of the bridge as much as possible. According to the
result of my research, when the height of the bridge is approximate one sixth
of the length of the bridge, it could bear more weight. One sixth of the 44m, the fixed length of the bridge, is 7.3m. According to the circulation
result, the 7.3m would be the perfect height. At the same time, the length of the interval between
fixed junctions on the surface of the bridge is 4m. The equal literal triangle would
reach the most stable balance. The compromising of these two facts, a double-decker
bridge would be an ideal option.
Design constraint:
There are several constraints for the bridge design. First,
the number of joint on the surface of the bridge is fixed. Second, the using of
the cable and the intermediate support are forbidden. Third, the available time
of the design is limited.
The cost of the design: $301726.57
2-D image of bridge design

Truck in the middle of the bridge
.jpg)
The result of Load test
.jpg)
How my bridge changed
during the design
Design Version 1

Design Version 2

The cost of the design version 1 is $509902. The cost of the
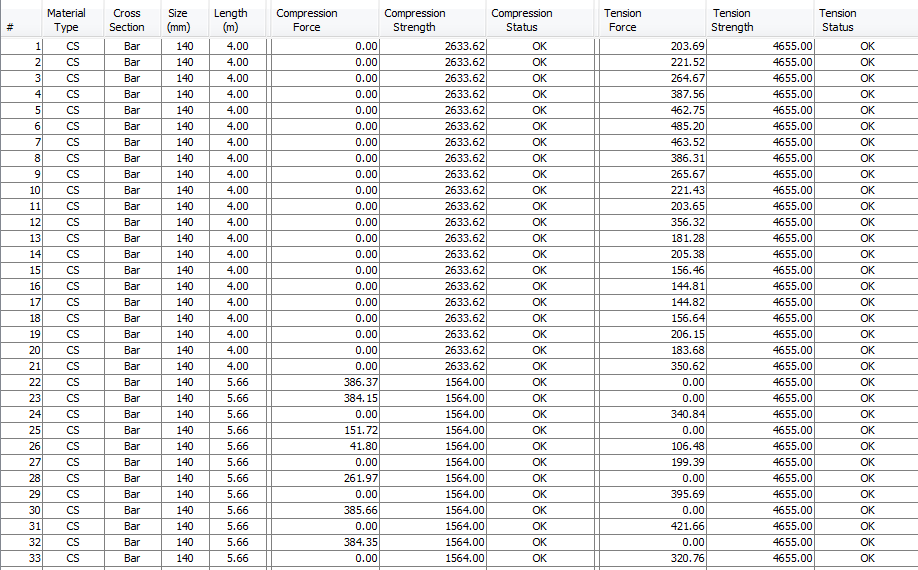
design version 2 is $486612. All of these three version could satisfied the safe requirement. But the evolution from version 1 to version 3 took a long time. I did the comparison between three different basic combinations of the triangle which are Howe, Pratt, and Warren. I did the comparison between hollow tube and solid bar. I did the comparison between different member types with different thickness. If some members were bearing less force, I would reduce the thickness of it. And if some members were bearing too much load, and I would increase the thickness.
The money issue
The current cost of the bridge is $301726.57 . It is the result of many hours of testing and research. There are still some room for the improvement by adjusting the thickness of the membrane. And in the future, theoretical research of truss bridge and detail force analysis would greatly help to improve the bridge. My goal is control the budget under $300000.
What I learned from the bridge
Before I built the bridge, I thought design is coming from instantaneous inspiration. But after I have faced more than thirty times of collapse of the bridge, I realized that design is about patient and courage. Being patient to redo the bridge, and the courage of erase the original design are critical in this assignment . I need to use my ability of reasoning and analysis to find out the negative part of my old design and invent a new one.
Tuesday, April 17, 2012
Research Questions
1. Where can I find information concerning the leading construction companies in the bridge-making business today?
2. What's the most efficient way to find topics about leading innovations in bridge designs in the near and far future?
3.Where can I find information on the most common and unique causes of bridge failure in the past and the steps taken to avoid these by other designs?
2. What's the most efficient way to find topics about leading innovations in bridge designs in the near and far future?
3.Where can I find information on the most common and unique causes of bridge failure in the past and the steps taken to avoid these by other designs?
A1-VERGIZA
At the beginning of my design, I saw that creating an arc-type truss above the roadbed would prove to be the most sufficient and give the bridge a very powerful basis of construction. Once the outer shell was complete I began filling the bridge design with small, strong triangles in order to reinforce the already strong structure. After a few tweaks and test runs, I saw my compression in the top portion was too much so I added a truss under the bridge with basic large triangles and this gave my bridge the strength it needed to get to .41 and under in compression and tension across the design. As is, the bridge costs $754,714.75. Given a little more time over the next week or so, I believe I can get under the 700K threshold and still have a very sustainable bridge design. Upon completion of my design I did find the arc design to be the strongest while supported with small and medium sized triangles. Shown below are three photos of my bridge design, the compression/tension/truck and the Load test results in which I am quite pleased with.

Research Questions
The following are 3 questions I will have for class.
1. Where is the best place for me to find research on bridge designs that failed badly?
2. Where is the best place for me to find research on bridge designs that lasted the longest/are currently staying strong?
3. Where can I find research discussing new ways to design bridges for the future that have not been done yet that I can look at?
A1-REIFF
I designed my bridge with as many small triangles as possible because I felt this allowed for their to be a minimum amount of tension or compression on each beam of the bridge. I added extra support toward the far right and far left sides of the bridge so that it would not break right when the truck drives onto the bridge and drives off of the bridge. Over time I added as many beams as I could so there would be less tension and compression on each beam. Then I realized that some beams were not supporting much and were just causing the bridge to cost more, so I removed them from the design of my bridge. Right now my bridge costs approximately $873,000,000. I believe that over time I can reduce that price by at least $100,000,000 as I keep removing beams I feel are unnecessary for the bridge to be successful. By building this bridge, I have learned what shapes work best, and how much joints help in particular places. However, I also learned that I was overspending on some extra beams and I learned that it's quality and not the quantity of beams that the bridge has that matters. It's all about where the beams are placed. Below are all of the screenshots of my design and its tests.


Wednesday, April 11, 2012
Future teamwork
In the engineering 103 class, the ability
of team working is important for completing the assignments. The different
cultural backgrounds of three different people would result in different ways
of thinking. Especially, I am an international student who is coming from
China. More ideas accompanying conflictions would be appeared in our group. Our
group needs the teamwork during conversation and splitting works. It would help
us to work efficiently. And it is the process of learning group design. In the
future, we would individually design the bridges. Compromising are needed when the
ideal meet the reality, when the individual meet the group. Our group would
discuss the possibility of constructing for different bridges, and predict the highest
loads that we could reach. I believe our group would enjoy the future weeks of the
engineering 103 class.
Izzy
Teamwork
I think we can make an excellent bridge as a dream. I believe that all three of us have different and unique skills that when we combine with each other's skills will create the unbreakable bridge. The one thing we need to work on now the most is setting up meeting times to go over different designs for our bridge and decide as a group which features will allow us to design the best possible bridge. If we each design our own bridges and then combine the best parts of each bridge together we can have an unbreakable bridge. Just remember, team work makes the dream work!
Tuesday, April 10, 2012
Teamwork
Teamwork will be an essential part in the design and construction of our bridge. Ideas will conflict and be thrown out in order to make room for better conceptual thoughts that will provide a basis on which our bridge will be built so we can obtain a high cost/strength ratio. Once we have a basic, strong design in thought and put it down on paper, constructing it should not be an issue. Until we find out how much these bridges hold, we'll have no clue how or where to make them stronger. Although group members may be different or have conflicting ideas, this will give us the edge we need so we can cover all bases of thoughts provided by the individuals. As long as we think and do as a team, I believe our group will have a good couple of weeks ahead of us while designing our ideal bridge. Not only will we have a killer, Unbreakable bridge, we will learn to work with others and around obstacles which could harm the progress of any projects or real life situations.
Subscribe to:
Comments (Atom)